
As the temperature rises, a properly functioning car A/C system becomes an essential part of your vehicle. Whether you are stuck in traffic during a summer heatwave or embarking on a long road trip, a reliable A/C system ensures that the cabin remains cool and comfortable. However, like every other system in your vehicle, the air conditioning system requires regular maintenance and occasional servicing to keep performing correctly.
In this comprehensive blog, we will delve into everything you need to know about car A/C systems. From how the system works to common problems and safety tips, this guide will help you keep your car’s A/C running smoothly all year round.

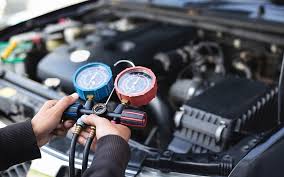
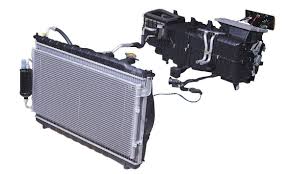
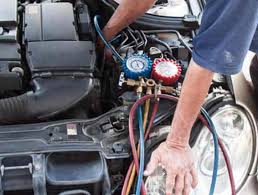

1. Understanding the Basics of Car A/C Systems
The car air conditioning system works on the principles of thermodynamics, essentially moving heat from the inside of your car to the outside. The system relies on a refrigerant fluid, which cycles between a gaseous and liquid state, absorbing heat and releasing it to cool the air inside your vehicle.
Key Components of the Car A/C System
To better understand how your A/C works, it is important to familiarize yourself with the key components that make up the system:
- Compressor: The compressor is the heart of your vehicle’s A/C system. It is responsible for compressing the refrigerant and circulating it through the system. The compressor uses power from the engine to do this, and it is typically located at the front of the engine bay.
- Condenser: After the refrigerant is compressed, it moves to the condenser. The condenser cools the refrigerant, changing it from a gas to a liquid. It works much like a radiator, using airflow to release the heat absorbed by the refrigerant.
- Evaporator: The evaporator is located within the cabin, typically behind the dashboard. It is responsible for absorbing the heat from the air inside the car. As the refrigerant flows through the evaporator coils, it evaporates, pulling heat out of the air and reducing the temperature in the cabin.
- Expansion Valve/Orifice Tube: These components regulate the flow of refrigerant between the high-pressure side and low-pressure side of the system. They adjust the amount of refrigerant that enters the evaporator, ensuring that the system operates efficiently.
- Receiver-Drier/Accumulator: This component removes moisture and contaminants from the refrigerant to prevent damage to the system. It also helps maintain the pressure balance within the A/C system.
- Refrigerant: Refrigerant is the substance that moves through the entire A/C system. It absorbs heat from the air in the cabin and releases it outside. Modern systems typically use R-134a refrigerant, while newer vehicles may use the more environmentally friendly R-1234yf.
- Blower Motor and Vents: The blower motor pushes air through the A/C system, blowing cooled air into the cabin through the vents.
2. Common Car A/C Problems and Their Causes
Understanding the potential problems your A/C system may encounter is important for effective maintenance and timely repairs. Here are some common issues that can arise with your vehicle’s air conditioning system:
1. Warm Air Blowing from the Vents
One of the most common A/C problems is when the system starts blowing warm or hot air instead of cold. This can be due to several factors, including:
- Low Refrigerant: If the refrigerant level is low, the system won’t be able to cool the air effectively. This is the most common cause of warm air.
- Leaks: Over time, seals and hoses within the A/C system can wear out, causing refrigerant to leak. If this happens, the system won’t maintain the pressure needed to function properly.
- Compressor Issues: If the compressor fails, the refrigerant won’t be circulated properly, causing the air conditioning to blow warm air.
- Clogged Expansion Valve: A clogged valve can prevent the refrigerant from flowing properly, resulting in reduced cooling performance.
2. Unpleasant Odors from the A/C Vents
A musty or moldy smell coming from the A/C vents is a sign that moisture has accumulated within the system. This can lead to the growth of mold and mildew, which thrive in the damp environment inside the evaporator. To fix this issue, the A/C system may need to be cleaned, and the cabin air filter may need to be replaced.
3. Strange Noises Coming from the A/C
If you hear unusual noises, such as hissing, banging, or grinding sounds, it could indicate several problems, including:
- Hissing: A hissing sound may suggest a refrigerant leak.
- Rattling or Clicking: This could indicate that debris is stuck in the blower motor or that the blower fan is damaged.
- Grinding: Grinding noises may indicate a problem with the compressor or other moving parts.
4. A/C System Not Turning On
If the A/C system fails to turn on, it could be due to several reasons:
- Blown Fuse: A blown fuse may prevent the A/C from functioning, especially if there is an electrical issue.
- Electrical Faults: Problems with the wiring, switches, or relays can also prevent the system from starting.
- Compressor Clutch Failure: If the compressor clutch fails to engage, the A/C won’t work.
3. How to Maintain Your Car’s A/C System
Regular maintenance is key to extending the lifespan of your A/C system and ensuring that it operates efficiently. Here are a few essential tips for keeping your vehicle’s air conditioning in top condition:
1. Regularly Check the Refrigerant Level
The refrigerant in your A/C system gradually depletes over time. While it is not normal for refrigerant to leak out unless there’s a problem, a low level can reduce the system’s overall performance. If you notice warm air blowing from the vents or a decrease in cooling performance, it may be time to check the refrigerant level and recharge the system.
2. Replace the Cabin Air Filter
The cabin air filter is responsible for filtering the air that enters your car’s cabin. Over time, the filter can become clogged with dust, debris, and allergens, limiting airflow and affecting the A/C’s overall performance. It’s important to replace the cabin air filter at regular intervals to ensure maximum airflow and prevent musty odors.
3. Clean the A/C System
Cleaning the A/C system helps prevent the buildup of mold, mildew, and bacteria within the evaporator. You can use an A/C cleaning product or take your car to a professional for a deep cleaning. Keeping the system clean ensures fresh, cool air and improves the overall health of the system.
4. Run the A/C Regularly
Even in the winter, it’s a good idea to run your A/C for about 10-15 minutes every few weeks. This helps circulate the refrigerant and keep the components lubricated, preventing them from becoming stiff or damaged. It also prevents moisture buildup within the system.
5. Keep the Condenser Clean
The condenser is located at the front of the car and can easily get clogged with debris such as leaves, insects, and dirt. Cleaning the condenser ensures proper airflow and allows the system to release heat effectively. You can clean the condenser with a soft brush or compressed air.
6. Avoid Overloading the A/C System
Excessive use of the A/C system can strain its components, especially during prolonged journeys. Be mindful of the load you’re placing on the system. If you’re driving in extreme conditions or towing a heavy load, consider turning off the A/C to reduce strain.
4. How to Recharge Your Car A/C System
If your A/C is blowing warm air, it may be due to a low refrigerant level. Recharging the system is a relatively simple process that can often be done at home. Here’s how you can recharge your car’s A/C:
Step 1: Prepare the Necessary Tools
To recharge your A/C system, you will need the following items:
- A can of A/C refrigerant (commonly R-134a for most vehicles)
- A refrigerant recharge kit with a hose and pressure gauge
- Gloves and safety glasses
- A thermometer (optional)
Step 2: Locate the Low-Pressure Port
The low-pressure port is where you will connect the recharge hose. In most vehicles, the low-pressure port is located near the A/C compressor. Refer to your vehicle’s owner’s manual to find the exact location.
Step 3: Check the A/C System’s Pressure
Connect the refrigerant canister to the low-pressure port and check the system’s pressure with the gauge. The ideal pressure will vary depending on your vehicle, but generally, the gauge should be within the “green” zone.
Step 4: Add Refrigerant
If the pressure is low, add the refrigerant by holding the can upright and slowly releasing the refrigerant into the system. Be careful not to overcharge the system, as this can cause damage. Continue adding refrigerant until the pressure reaches the correct level.
Step 5: Check the Air Temperature
Once the system is properly charged, turn on the A/C and check the air temperature coming from the vents. It should be noticeably cooler than the outside air. If the air is still warm, you may need to add more refrigerant or check for leaks.
5. When to Seek Professional Help
While many A/C problems can be resolved with basic maintenance and recharging, there are a few situations where professional assistance is needed. If you notice any of the following,